
Sculpt Operating System 22.04
Introduction
Sculpt is a component-based desktop operating system that puts the user in the position of full control. It is empowered by the Genode OS Framework, which provides a comprehensive set of building blocks, out of which custom system scenarios can be created. The name Sculpt hints at the underlying idea of crafting, molding, and tweaking the system interactively. Starting from a fairly minimalistic and generic base system, this tour through the Sculpt system will cover the following topics:
-
A boot image that is a live system, rescue system, and bootstrap system all in one,
-
Connecting to a wired or wireless network,
-
Installing and deploying software,
-
Ways to tweak and introspect the system, and
-
Managing and accessing storage devices.
Community
The best place to learn more about using and tweaking Sculpt, to follow the work of the developers, and to get hold of announcements of new software and features is the federated Genodians blog:
- Genodians.org community blog
Feedback and contact
Your feedback is appreciated!
- Join the Genode mailing list for discussion
- Get in touch with the developers at GitHub
- Contact Genode Labs for commercial inquiries
A printable PDF version of this document is available at https://genode.org/documentation/sculpt-22-04.pdf.
Hardware requirements and preparations
Sculpt should be compatible with recent Intel-based PC hardware featuring Intel graphics, E1000 networking, Intel wireless, and AHCI/NVMe.
It is tested best on laptops of the Lenovo X and T series (X220, X250, X260, T430, T460, T470, T490). For experimenting with Sculpt, we recommend getting a refurbished version of one of these. You may also find the unofficial hardware compatibility list https://usr.sysret.de/jws/genode/hcl.html helpful for finding Genode-compatible hardware.
Sculpt has been tested with screen resolutions up to 2560 x 1440. Displays with a higher resolution are not expected to work. The sweet spot is a full-HD display.
Please revisit the BIOS settings of your machine in the following respects:
- VT-d enabled
-
Even though Sculpt is able to run without an IOMMU, we advise to enable this option for the sandboxing of device drivers.
- VT-x enabled
-
Hardware-assisted virtualization is needed to run VirtualBox on top of Sculpt.
- Execution prevention enabled
-
The standard Sculpt package is provided for x86-64 and expects your platform to support data execution prevention (abbreviated DEP or NX). If this feature is disabled your PC will just reboot on startup.
- Boot from USB enabled
-
Sculpt is usually booted from a USB stick.
- UEFI boot enabled
-
Sculpt boots via UEFI by default. The boot image is specially prepared such that it can be started via legacy boot on older machines. However, booting it via legacy boot on a modern machine is hit or miss.
- UEFI secure boot disabled
-
The Sculpt boot image is not cryptographically signed.
- Optimize for performance when battery powered
-
If the latter is not set, the hardware may behave erratically (e.g., non-working trackpoint when on battery).
Getting a first impression
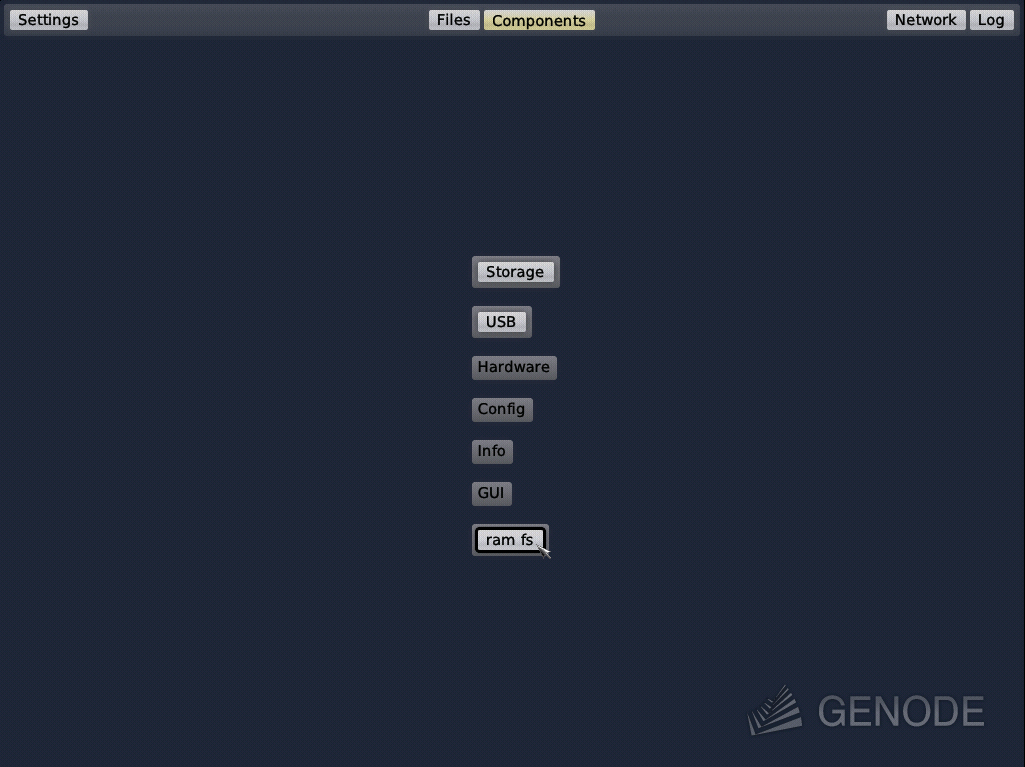
Sculpt is best explored by first booting the prebuilt disk image downloadable from https://genode.org/download/sculpt. Right after system boot, Sculpt's system-management user interface ("Leitzentrale") appears. The panel at the top of the screen contains two centered tabs for switching between the "Components" view and a "Files" view (Figure 1). The components view displays a live graph of the software components and their relationships. It also provides convenient access to the connected storage devices. The "Log" button at the right side of the panel reveals diagnostic messages, the "Network" button allows you to configure network connectivity, and the "Settings" button on the left gives access to a few user-interface tweaks (Figure 1).
|
Consider the following steps as a warm-up with Sculpt OS.
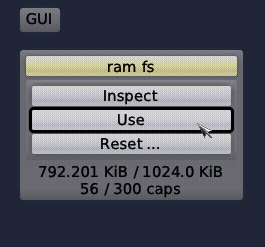
Select the in-memory file system as default storage location by clicking on the "ram fs" component in the graph and pressing the "Use" button (Figure 2). This way, software will be installed solely into memory without accessing any real storage device.
|
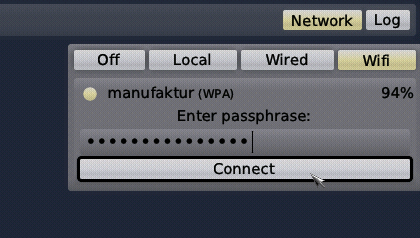
Enable networking in the "Network" dialog by selecting the "Wired" or "Wifi" option. In the latter case, select an access point and enter the corresponding passphrase (if needed). A successful network connection is indicated by the IP address displayed at the bottom of the network dialog (Figure 3).
|
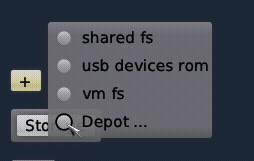
With a storage location selected and established network connectivity, it is time to install and start additional components by clicking on the + button of the components view. Select "Depot ..." from the menu (Figure 4).
|
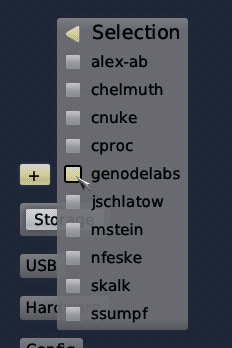
The depot contains software packages, which can be obtained by different independent software providers. The selection of software providers is completely up to the user and can be defined in the "Selection ..." sub menu (Figure 5).
|
Select "genodelabs" to download the directory of software officially provided by Genode Labs. Note that the other options are not necessarily affiliated with Genode Labs. Think of each option as a different individual. If you don't trust one particular software provider, you can still install and use the provided software without risk as long as you don't explicitly grant their components access to sensitive parts of your system. The judgement of trust is entirely yours.
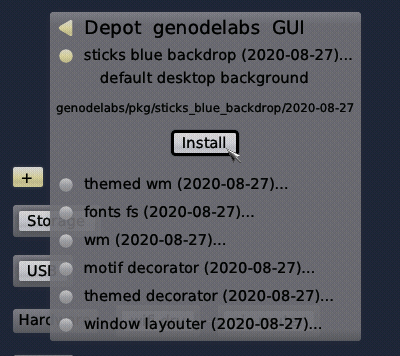
When now going back to the depot menu, a new menu item "genodelabs ..." appears. It leads to a catalogue of software browsable via hierarchically structured menus. As a starter, let's add a desktop background. In the "GUI ..." sub menu, a click on the first item named "sticks blue backdrop" reveals the option to install the package (Figure 6).
|
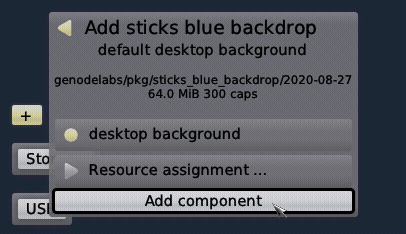
A click on the "Install" button triggers the download of the package and its dependencies. Once the download is complete, the menu presents a configuration dialog that allows you to define the interplay of the new component with the system. In this particular case, you have to decide for a GUI service to be used by the backdrop (Figure 7).

|
The first option "system GUI server" would grant direct access to the system's low-level GUI server, which is normally not used by applications but by higher-level GUI servers like a window manager. The second option would give the component the privilege to act as a lock screen. The third option would connect the component to the special "desktop background" GUI session, which appears as a layer behind all other applications. The fourth option "keyboard focus" is preserved for a single component that controls the keyboard focus. In our case, "desktop background" is the correct choice. Once the configuration is complete, a new button for adding the component to the system appears (Figure 8).
|
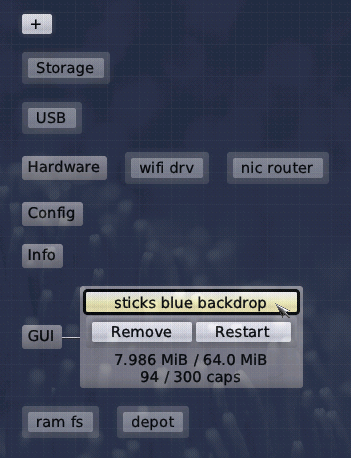
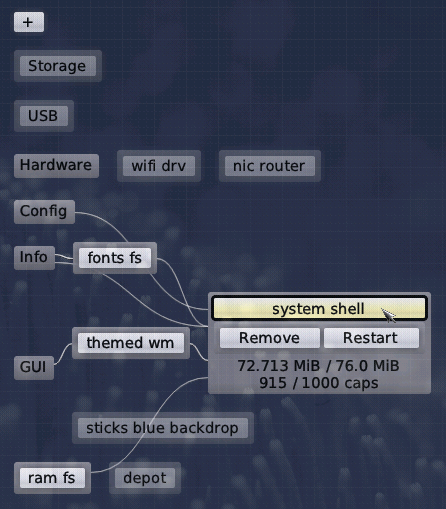
After pressing the button, you should notice a slight visual change. Press F12 to toggle between the Leitzentrale and the desktop. Now, the backdrop should become visible in full glory. In the component graph, the new component appears connected to the "GUI". A click on the component reveals further information along with the options to remove it from the system or to restart it (Figure 9).
|
As a next step, let us add a window system. In the + menu, you can find a readily packaged window system at genodelabs -> GUI -> themed wm. After installing the package, you are asked to take five decisions:
The GUI (focus) should be assigned to "keyboard focus" to put the window manager in charge of controlling the keyboard focus, which is part of its job after all. The GUI should be assigned to "system GUI server" as the basic mechanism to be used for graphical output and user input for the windowed applications. By assigning Report (shape) to pointer shape, we allow the window manager to report information about mouse-pointer shapes. By assigning Report (clipboard) to global clipboard, we grant the window manager the right to change the content of the global clipboard. Vice versa, by assigning ROM (clipboard), we permit the window manager to obtain clipboard content.
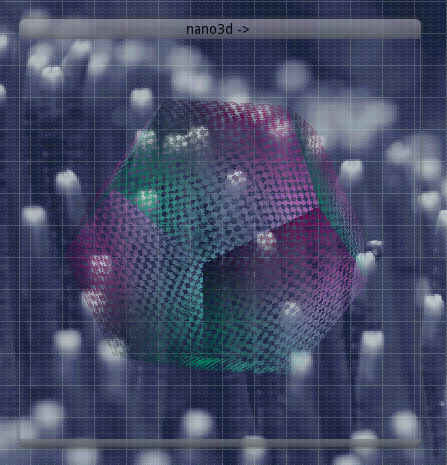
After adding the component, the "themed wm" will appear in the components view. To give the window system a quick try, add the small demo you can find at genodelabs -> Demos -> nano3d and assign its GUI to our "themed wm". You will be greeted with the window as shown in Figure 10.
|
Next, let us add a small Unix-like subsystem called system shell hosted in a window. This subsystem will be presented in a terminal window. The font used by the terminal is obtained from a font server. To create the font server, install and add the package genodelabs -> GUI -> fonts fs, and assign the system font configuration to its ROM (config). "ROM" means read-only memory. So we grant the font server read-only access to the system's default font configuration (which is generated automatically according to the screen resolution).
For starting the actual system shell, select and install genodelabs -> Tools -> system shell from the menu. The configuration dialog is a bit more elaborate this time.
- GUI
-
defines the GUI server that should host the terminal. Select "themed wm".
- File system (config)
-
defines which file system should be mounted at /config/ inside the instance. There exist a number of options. By selecting writeable system configuration, we grant control over the whole system. It goes without saying that this should not be done lightheartedly. However, since we trust the "system shell" package from Genode Labs, let's do it.
- File system (report)
-
defines the file system to be mounted at /report/ inside the instance. By selecting "read-only system reports", we allow the instance to look at the state of various parts of the system.
- File system (target)
-
defines a file system to be mounted at /rw/. This can be any file system you'd like to work with or explore, for example the "ram fs".
- File system (fonts)
-
defines the place where to obtain the font used by the terminal. Select the "fonts fs" component we have started earlier.
- ROM (vimrc)
-
defines the configuration for the vim text editor used within the instance. Select "default vim configuration" to grant read-only access to this information.
- ROM (clipboard)
-
defines the service to obtain clipboard content from. Select "themed wm" (not "global clipboard").
- Report (clipboard)
-
defines the service for reporting new clipboard content. Select "themed wm". More information about the integration and use of the clipboard can be found in a dedicated article.
- Region maps
-
Select "custom virtual memory objects" to allow the subsystem to manage its virtual memory layout by itself.
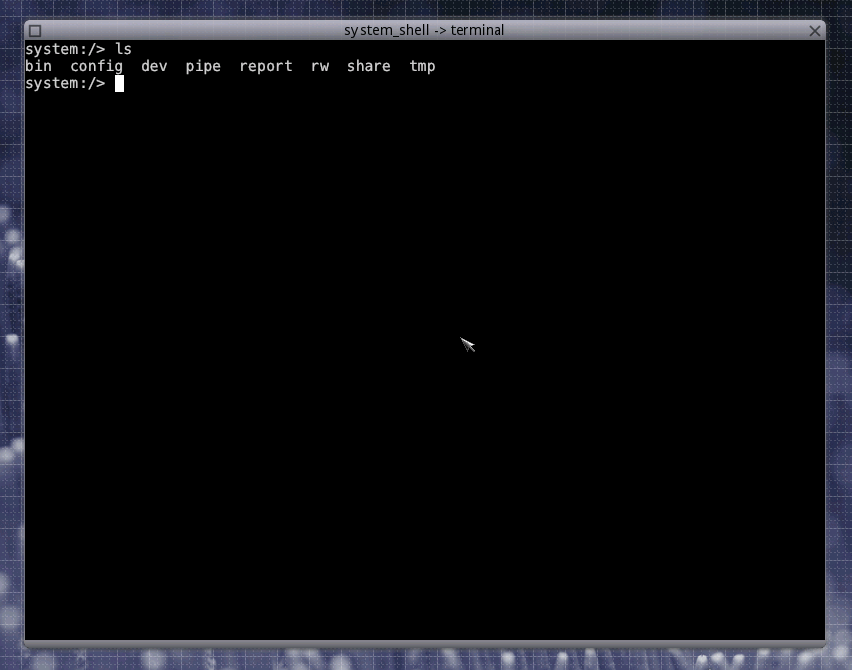
With those decisions taken, a fresh system shell can be started, which appears in a window (Figure 11).
|
When selecting the "system shell" component in the graph, the relationship to the other components of the system is presented. This provides a convenient way to reveal the trusted computing base of the selected component (Figure 12). For example, since there is no connection from system shell to the nic_router, we know that this component is isolated from the network. The network-related components are outside the trusted computing base of the system shell.
|
Further exploration
Of course, there are many more components to explore and to combine. For inspiration, please follow the postings at https://genodians.org, for example:
- Copy and paste mechanism
-
Sculpt provides a built-in mechanism for exchanging data between virtual machines, terminals, and Qt applications:
- Use GNU/Linux inside a virtual machine on top of Sculpt
-
There is a ready-to-use package for downloading Debian for the use inside a virtual machine along with the ability to use VirtualBox guest additions:
https://genodians.org/jws/2019-07-08-download_debian-guest-additions-reloaded
For configuring and starting the virtual machine, you may find the following guide useful:
https://genodians.org/m-stein/2019-03-07-vm-with-sculpt-ce-preview
You may even go a step further by re-using an existing Linux installation inside VirtualBox on Sculpt:
https://genodians.org/jschlatow/2021-04-23-start-existing-linux-from-sculpt
- Disposable Firefox VMs
-
Use a minimalistic Tinycore-Linux system to run Firefox in memory without access to any persistent storage:
https://genodians.org/alex-ab/2019-03-06-disposal-browser-vm
- Advanced window management
-
Let Sculpt remember window positions across reboots, swap out window decorations on the fly, and have fun with manipulating the window layout directly via a textual interface.
- Encrypted file store
-
The file-vault package provides Sculpt users with an easy way to set up and use an encrypted file store using Genode's custom CBE block encrypter.
https://genodians.org/m-stein/2021-05-17-introducing-the-file-vault
- Network connectivity via LTE
-
The article describes several ways of using Genode's LTE modem driver as network uplink.
Base system
Unless customized, the Sculpt base system resides as a self-contained live operating system on a USB stick, not installed on disk. This has two advantages. First, it makes the update of the base system straight-forward and completely risk-free. Simply install the new version on a second USB stick. Should the new version cause any trouble, one can fall back to the original one by swapping the USB sticks. Second, it alleviates the need to install any boot-loader infrastructure on disk. In fact, one can use an entire disk as one file system without creating a partition table.
Note that Genode is not limited to booting from USB. It also supports the use of partitions. But for this guide, we keep things as simple as possible.
System overview
|
|
System overview
|
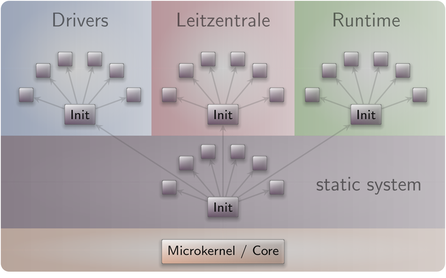
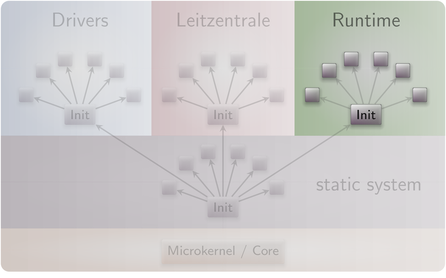
The Sculpt system consists of four parts living on top of the microkernel (Figure 13).
Static system
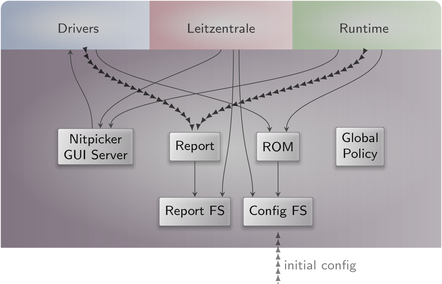
The first - static - part of the system is baked into the boot image. It contains components that must be shared by the upper - dynamic - parts and defines the relationships between the upper parts via a static policy that is fixed by the creator of the boot image (Figure 14).
|
|
Detailed look at the static part of the system
|
Besides a low-complexity GUI multiplexer called Nitpicker, the static system contains two in-memory file systems. The config file system stores configuration data whereas the report file system stores information reported by components. These file systems are invisible to regular components. Components obtain their configuration data from a (read-only memory) ROM service, and report their state to a (write-only) report service.
At boot time, the config file system is pre-populated with information from the boot image. It stays in memory. Hence, after rebooting the system, any changes are gone.
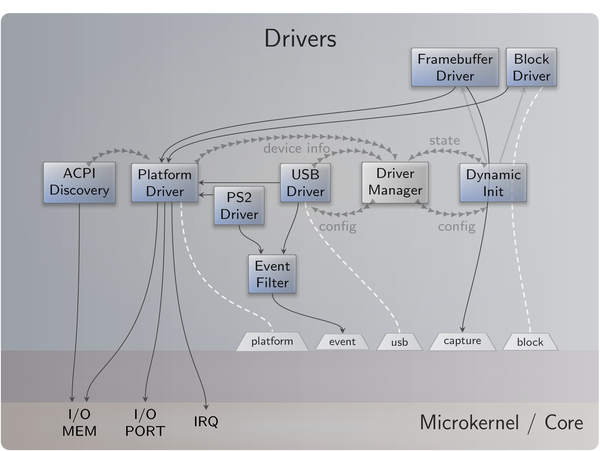
Drivers subsystem
The drivers subsystem provides all the basic services needed to realize an interactive system scenario: a framebuffer driver for the graphical output, input drivers to obtain user input, and a block service to access a storage device. All other drivers like networking or audio drivers are not covered by the drivers subsystem. They will enter the picture at a later stage and will use the platform service and USB service to access device resources.
|
|
Services provided by the drivers subsystem
|
As illustrated by Figure 15, some drivers like the framebuffer driver live in a dynamically managed subsystem that depends on runtime discovery of the hardware by the so-called driver-manager component. Whenever an Intel graphics device is present, the Intel framebuffer driver is spawned. Otherwise, a generic VESA driver or a driver for a boot-time-initialized framebuffer is used.
Several components of the drivers subsystem report their state. For example, when the Intel framebuffer is used, it reports the list of connectors present. Most importantly, the driver manager reports the available block devices.
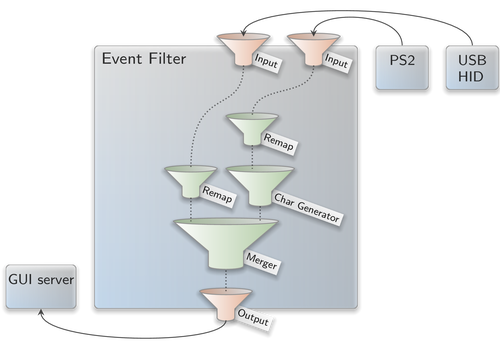
As user input may enter the system in multiple ways - most prominently PS/2 and USB HID - the drivers subsystem contains a so-called event-filter component that merges these event streams and applies transformations like key remappings or mouse acceleration.
Leitzentrale subsystem
The Leitzentrale gives you - the user - full control over the config file system and the report file system. You are free to inspect and manipulate the system in any way you wish. The German term Leitzentrale refers to a control center that requires a certain degree of sophistication from the operator, which would be you. A typo at the wrong place may render your system temporarily inaccessible, eventually requiring a reboot. But don't be afraid. Since all manual changes performed in the Leitzentrale occur in memory only, you are not at risk of permanently bricking your machine.
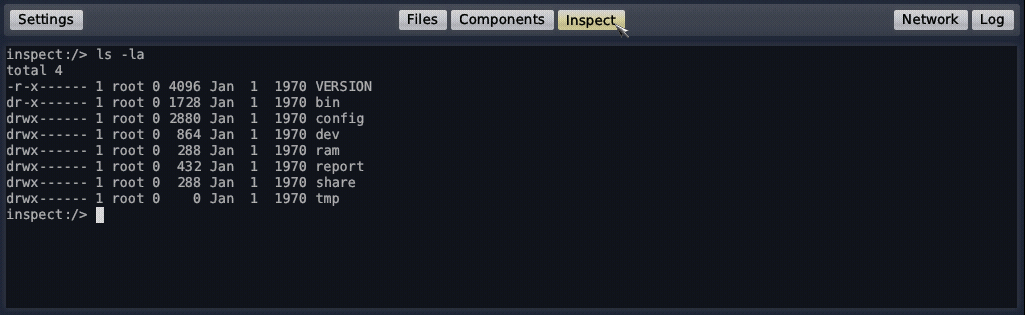
The Leitzentrale can be toggled at any time by pressing F12 and will be enabled right after boot. It presents itself with a minimalistic GUI for accessing the storage devices attached to your machine and for configuring your network connectivity. Most importantly, however, it allows the user to access the config and report file systems. Both file systems are readily accessible under the "Files" tab of the panel. The file browser allows you to traverse directory hierarchies, inspect individual files, and edit files. Alternatively to the "Files" tab, Sculpt 22.04 features a command-line interface. To spawn this command-line interface, click on the "ram fs" component in the graph and select "Inspect". In the panel, a third tab named "Inspect" appears, which hosts the command-line interface (Figure 16).
|
The inspect tab hosts a small Unix-like runtime as user interface. Don't let the presence of a Unix shell mislead you. Sculpt is not a Unix system. It merely uses Unix-like subsystems as convenient tools for managing and editing files. Within the inspect tab, you can interact with both the report and config file systems using familiar commands such as the bash shell, a subset of coreutils, and Vim.
Note that the interactive inspect view is not bullet-proof. Should you get stuck, you may re-spawn it at any time by toggling the "Inspect" button.
Besides the interactive shell, the Leitzentrale employs a simple viewer of the most recent diagnostic log messages. You can toggle the log display via the panel's log button. Each line of the log is prefixed by the label of the originating component. For detailed analysis, the complete log is also available at report/log and can be browsed with Vim in the inspect window.
Tweaking and inspecting the system
The Leitzentrale subsystem empowers you to interactively inspect and tweak the running system either by using the file browser hosted in the "Files" tab or by using the command-line interface and the Vim text editor provided by the "Inspect" tab.
Interactive file browser
The "Files" tab of the panel switches the main screen area to a simple file browser that lists all file systems available, in particular the config and report file systems (Figure 17). By toggling one of the file-system buttons, the respective directory hierarchy can be browsed. When hovering a file, an "Edit" or "View" button appears, which can be used to open the file in a text area that appears on the right side of the file browser. The editor supports the usual notepad-like motions, operations, and shortcuts (control-c for copy, control-v for paste, control-s for save).
|
Note that the file browser as the most recent addition to Sculpt does not yet support file operations like the copying, renaming, or removal of files. Also the editing of files with long lines or the browsing of directories with many entries is not appropriately covered yet. As a fallback when encountering these limitations, the current version of Sculpt still features the Unix-based inspect tab, which can be activated by toggling the "Inspect" button inside the USB or storage nodes of the component graph.
Vim skills recommended for using the inspect tab
With the "Inspect" button toggled for at least one file system, the inspect tab leverages (a subset of) GNU coreutils, bash, and Vim as the user interface for sculpting the system. If you are not yet familiar with using Vim, you may take Sculpt as a welcome chance to get your toes wet. To enjoy the experience, you should be comfortable with the following operations:
-
Opening and navigating within a text file (moving the cursor, using / to search),
-
Using the insert mode to make modifications,
-
Reverting accidental modifications (u undo),
-
Saving a modified file (:w),
-
Opening a file in a secondary buffer (:e),
-
Switching between buffers (:bn for next, :bp for previous),
-
Copy and paste (v start selection, V start line selection, y remember selection, p paste remembered selection),
-
Exiting Vim (:x save and exit, :q! discard changes).
Adjusting the user-input handling
By default, Sculpt uses the US-English keyboard layout but it offers a few alternative keyboard layouts like French and German in the settings menu at the upper left corner. A change of this setting is reflected in the config/managed/event_filter file, which is the configuration for the event-filter component mentioned in Section System overview. For tweaking the input processing beyond the keyboard-layout setting, copy this file to config/event_filter.
inspect:/> cp /config/managed/event_filter /config/event_filter
With the config/event_filter file in place, you may notice that the keyboard-layout menu has vanished. This is because now you have taken over manual control. (BTW, you can get the menu back at any time by removing the file).
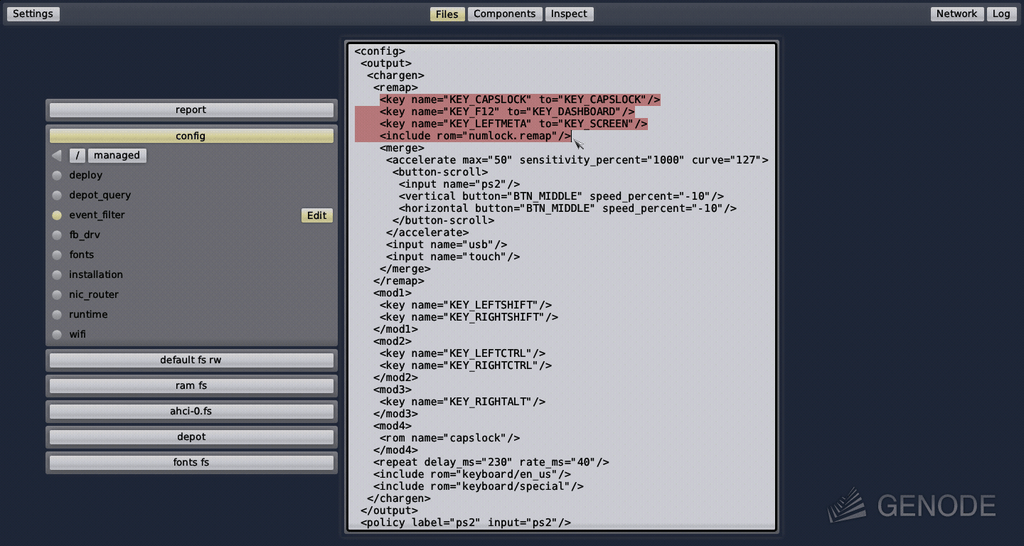
As a Vim user, you most likely want to remap the useless capslock key to escape, don't you? You can accomplish this by editing your /config/event_filter file.
inspect:/> vim /config/event_filter
To remap the capslock key to escape, change the following line
<key name="KEY_CAPSLOCK" to="KEY_CAPSLOCK"/>
to
<key name="KEY_CAPSLOCK" to="KEY_ESC"/>
After saving the file, a Vim user's life suddenly becomes much more pleasant.
|
|
Filter chain for user-input events
|
Take the time to review the remaining parts of the event-filter configuration. The nested configuration nodes define a hierarchy of filters that are applied in the order from the inside to outside (Figure 18). There are filters for merging events (<merge>), remapping buttons and keys (<remap>), supplementing symbolic character information (<chargen>), pointer acceleration (<accelerate>), and emulating a scroll wheel by moving the pointer while pressing the middle mouse button (<button-scroll>).
Display settings
If you are running the Intel graphics driver, you can inspect the connected displays and their supported resolutions by taking a look at the report at /report/drivers/dynamic/intel_fb_drv/connectors. This report is updated whenever a display is connected or disconnected. You can use this information to enable or disable a display in the driver's configuration, which you can find at /config/fb_drv.
For a quick test, change the attribute height="768" to force_height="768" (you may modify width analogously). When saving the file, the screen real-estate will forcibly be limited to the specified size. This is helpful during presentations where the projector has a lower resolution than the laptop's internal display. By specifying the beamer's resolution, both the laptop and the beamer show the same content.
Exploring the drivers and Leitzentrale subsystems
You can review the construction plan of the drivers subsystem by opening the file drivers at the config file system. In particular, it is interesting to follow the <route> rules to see how the various components are connected. But there is more. The configuration is live. It enables you to reconfigure individual components on-the-fly. For example, search for the <start> node of the PS/2 driver and add the attribute verbose_keyboard="yes" to the embedded <config> node. By saving the file, the changed configuration becomes effective. Any key pressed or released on the PS/2 keyboard will result in a log message on the right. You may revert this change (vim: u) and save the original version of the file.
Note that not all components are dynamically reconfigurable but many modern ones - in particular the init component and most long-running server components - are.
It is possible to forcibly restart a component by adding a 'version' attribute to the <start> node. Whenever the version value is changed, the component is re-spawned.
The component-specific configuration options are documented in the README files accompanying the respective components in the source tree.
Analogously to the drivers subsystem, you can find the construction plan for the Leitzentrale subsystem at the file leitzentrale. Try out the following tweaks:
-
Change the transparency of the Leitzentrale by modifying the alpha attribute of the fader component.
-
Change the font size of the log_terminal component from "10" to "18".
You may also enjoy tinkering with the configuration of the Nitpicker GUI server, which is located at the file nitpicker. For example, you may change the background color or the labeling color of the "default" domain.
System resources
Whenever adding a new component via the + menu, one has to define how to connect the component with the rest of the system. It is important to know what the presented options mean to take educated decisions.

|
Each choice represents a connection to a system resource of a particular type. Initially, the presented options are resources that are built-in into Sculpt's base system. Once new components enter the picture, their services also appear as options.
| Resource type | Interface | Built-in options |
|---|---|---|
| Audio input | Audio_in | |
| Audio output | Audio_out | |
| Block device | Block | direct block-device access |
| Capture | Capture | system GUI |
| management GUI | ||
| Device access | Platform | wifi hardware |
| network hardware | ||
| audio hardware | ||
| ACPI | ||
| Direct memory-mapped I/O | IO_MEM | raw hardware access |
| Direct port I/O | IO_PORT | raw hardware access |
| Direct device interrupts | IRQ | raw hardware access |
| Event | Event | system input events |
| management GUI events | ||
| File system | File_system | writeable system configuration |
| read-only system reports | ||
| used file system | ||
| GPU | Gpu | hardware-accelerated graphics |
| GUI | Gui | keyboard focus |
| desktop lock screen | ||
| desktop background | ||
| system GUI server | ||
| Hardware virtualization | VM | virtualization hardware |
| Network | Nic | |
| Network uplink | Uplink | |
| Protection domain | PD | system PD service |
| Real-time clock | Rtc | |
| Region maps | RM | custom virtual memory objects |
| Report | Report | system reports |
| pointer shape | ||
| global clipboard | ||
| ROM | ROM | global capslock state |
| default vim configuration | ||
| system font configuration | ||
| platform information | ||
| system status | ||
| global clipboard | ||
| Terminal | Terminal | |
| Tracing | TRACE | system-global tracing |
| USB | Usb | direct USB-device access |
Table 1: Overview of system resources
Table 1 gives an overview of the different built-in resources and their types. The names given in the interface column correspond to the Genode session types as found in the routing rules of the deploy configuration or launcher definitions (Section Runtime management). Let's look into each type in more detail.
GUI
The GUI service interface is provided by the low-level system GUI server (named Nitpicker) as well as the higher-level window manager. It entails both the ability to perform graphical output and the reception of user input. Note that the low-level GUI server keeps its client applications isolated by default. One application cannot see the output of other applications nor can it sniff user input globally. One can connect multiple applications - trusted and untrusted alike - to the low-level GUI server without fear.
However, in typical scenarios, applications don't use the bare-bone system GUI server directly but rather employ a window manager that sits in-between the system GUI server and the applications, and equips the system with the notion of windows.
The base system provides three different GUI options.
- keyboard focus
-
grants control over the keyboard focus. It should be assigned to only one component, typically a window manager. However, in principle, another component like the system shell can be connected to it and thereby becomes able to receive keyboard input.
- desktop lock screen
-
assigns the component the role of a lock screen. Once the component is present at the GUI, it seizes the keyboard focus and is able to cover the entire screen.
Note that - with the current version of Sculpt - global keys as defined in the nitpicker configuration are not affected by the lock screen, i.e., as is the case with the screen key assigned to the window manager.
- desktop background
-
allows a component to present its graphical output in a dedicated layer behind all other applications. The desktop background cannot receive keyboard focus. But it can respond to pointer events (mouse clicks and motion).
- system GUI server
-
allows a component to perform graphical output and handle pointer events, but no keyboard input. It is designated as a base mechanism for the window manager, or for implementing GUI features like global overlays or status displays.
By the way, the configuration of the low-level GUI server can be found at /config/nitpicker and can be modified on the fly.
ROM
ROM stands for read-only memory. A ROM service reveals information to its clients but a client cannot change the information. Note that the provided information does not need to be static. It can potentially change over time. Whenever that happens, the ROM service informs its clients about the availability of a new version. The base system provides the following built-in ROM resources:
- global capslock state
-
the system-global state of the capslock key. It can be handed out to components like virtual machines to keep the capslock state of guest operation systems consistent with the host.
- default vim configuration
-
the configuration of the Vim text editor as used in the Leitzentrale's inspect window and managed at /config/vimrc. It allows you to customize one vim configuration at a central place and use this configuration consistently across Sculpt's inspect window and manually deployed components.
- system font configuration
-
is the default font configuration managed by Sculpt according to the current screen resolution. It is of course customizable by the user. By using this configuration, components can foster a consistent user experience regarding the display of text.
- platform information
-
provides details about the underlying kernel and hardware. Some drivers and virtual machine monitors need this information to take platform intrinsics like the concrete flavor of virtualization hardware into account. Normal applications should never need this information.
- system status
-
reflects the system-global power state. It is used by the optional ACPICA driver to respond to requests for a system reset or power-down.
- global clipboard
-
provides the current content of the global clipboard. The content can be accessed by a component only when the user interacts with the component. This prevents overly nosey components from snooping the clipboard content.
Report
Report services play the counterpart of ROM services. They allow clients to report information in a fire-and-forget fashion, but not to retrieve information. As explained in Section System overview, the base system includes a report service that aggregates incoming reports into the in-memory report file system. The incoming reports are organized according to their origin (their session labels). By granting a component access to the system reports, the component can contribute to this knowledge base. However, keep in mind that Sculpt's built-in report file system is limited in size. A misbehaving component may put the system in jeopardy by producing overly sized reports.
- pointer shape
-
Reports labeled with shape play a special role. They are routed to the mouse pointer and thereby enable graphical applications to suggest context-specific pointer shapes. The application-provided shape is shown whenever the corresponding application is hovered.
- global clipboard
-
enables components to write new content to the system-global clipboard. This operation, however, is restricted to the single component that the user currently interacts with. This prevents rogue components from spamming the global clipboard.
File system
A file-system service offers the storage and retrieval of data organized in a hierarchical directory structure. Access to a file system can be restricted to be read only. The distinction between read-only and read-writeable does not exist per file but for the entire file-system resource.
Of course, many use cases call for finer-grained access control. This is where intermediate chroot file-system components come into play. Such a component reduces the view on an existing file system to a specific sub directory, which then appears as a new file system to the application. For examples, please review the launchers at /config/launcher/ such as the shared_fs.
The Sculpt base system has two built-in file systems.
- writeable system configuration
-
corresponds to the config file system described in Section System overview. The ability to access this file system equals to total control over the system. Hence, never assign this file system to components that you don't fully trust.
- read-only system reports
-
allows the client to inspect the global state of the system. The reports found in this file system are organized in a directory structure that corresponds to the system structure. For example, all reports generated by the runtime sub system reside within the runtime/ directory. Note that this global state may contain sensible information. For this reason, the system reports should not be handed out to components that are suspected of information leakage.
The two built-in file systems reside in memory. In order to access persistent storage, additional file-system services can be started as regular components within the runtime subsystem. Those components, in turn, need to be connected to the corresponding block devices.
- used file system
-
is the file system selected for the use of Sculpt. In principle, the specific file system such as "usb-1-10.3.fs" can be selected directly. But when moving configurations from one device to another, the generic "used file system" option avoids tying the component to a particular physical file-system name. The resulting configuration works regardless of where it is deployed.
Block device
A block-device resource allows for the block-level storage and retrieval of data whereas a block-device can be read-only or read-writeable. The base system's built-in block service hands out the devices listed at /report/drivers/block_devices according to the label of the client's session. The label must correspond to the name of the block device. Typically, the built-in block service is used via manually created launchers by using a route like this:
 <route>
   <service name="Block"> <parent label="ahci-1"/> </service>
 </route>
Device access
With Sculpt, device drivers can be installed and used like any regular component. In contrast to plain applications, however, device drivers need to access the corresponding device hardware. This access is guarded by the so-called platform driver hosted in the drivers subsystem. The platform driver has two purposes. First, it uses the IOMMU to isolate devices from each other and to restrict the reach of each device to the memory explicitly assigned to the device (DMA buffers). Second, it arbitrates the access of device-driver components to devices.
Regarding the latter, the platform driver differentiates four categories of drivers, namely wifi, network, audio, and ACPI. When assigning one of those resources to a driver component, the driver will see a virtual PCI bus with only the devices that fall in the chosen category.
Note that USB, AHCI, NVMe, and PS/2 are handled differently as those devices are driven by Sculpt's drivers subsystem.
USB
By connecting a component to USB, the component becomes able to access individual USB devices. The device is selected by the component by specifying a session label that corresponds to a name of a device listed at /report/drivers/usb_devices. The most prominent use case for the USB resource is the direct assignment of USB devices to virtual machines as described in Section Updating the USB boot device from within VirtualBox.
Real-time clock
The real-time clock enables a component to know what time it is. The service is optionally provided by a package called system clock.
GPU
Access to the GPU (graphics processing unit) service allows a component to utilize hardware-accelerated graphics on machines that feature a GPU supported by Sculpt. Supported are Intel GPUs of generation 8 (Broadwell) or newer.
Note that GPU support is a very recent feature and has thereby not received intensive testing yet. Please regard it as experimental and use it with caution.
Region maps
The region-map service of the base system gives components a flexible way to manage their virtual address spaces manually. This mechanism is used by a few advanced components only, most specifically virtual machine monitors. Access to the region-map service is not security critical. But as it is rarely needed, it is not granted by default to limit the potential (attack) surface of the base system as far as possible by default.
Direct memory-mapped I/O, port I/O, and device interrupts
These low-level services are provided by Genode's core component. They should never be needed by any regular component. Even device drivers don't use those services directly but rather rely on the higher-level device-access service described in Section Device access.
However, a few special use cases demand for such low-level access. In particular the use of ACPI functionality.
As a rule of thumb, never grant access of those resources to any component except you know exactly what you are doing and you completely trust the provider of the component.
Tracing
The low-level tracing interface allows a component to observe and to manipulate all activities in the system. It should only be granted to components that are fully trusted.
Hardware virtualization
The hardware-virtualization service allows virtual machine monitors to leverage virtualization technology (Intel VT).
Protection domain
By default, each component implicitly relies on the protection-domain (PD) mechanism provided by the operating-system kernel. However, Sculpt OS allows for the optional interception of a component's interplay with this low-level mechanism through another component. This is useful for dynamic CPU-load balancing, debugging, or statistical profiling.
The option to select a protection-domain service is only displayed in the presence of at least one component that provides a PD service. Note that a PD service is able to exercise full control over each component that uses the service.
Network and uplink
Network services provide an interface for sending and receiving network packets. Sculpt's Leitzentrale conveniently manages drivers for wireless (wifi drv) and wired (nic drv) networking as well as the user-level network routing component (nic router). So you usually see the NIC router as an option. The NIC router multiplexes the network access among multiple network applications. By default, it acts as a virtual NAT router, handing out a distinct IP address to each client.
An uplink server is a connection point of a network driver, which supplies the driver with network packets to send, and accepts incoming packets received by the driver. In most situations, the NIC router provides this service.
Terminal, audio input, and audio output
Terminal services allow for the input and output of streams of text. Examples are a graphical terminal, or a UART driver. The base system has no built-in terminal service.
As the names suggest, audio input and output enable components to record and play audio. The base system does not provide such services. Instead, audio infrastructure like drivers and a mixer can be installed as regular components.
Capture and event
The capture and event interfaces serve as counter parts of the GUI interface. Whereas the GUI interface allows a client to put pixels on screen and receive input events, the capture and event interfaces allow a client to capture the screen and inject user-input events into the system. Normally, these interfaces are used by graphics and input-device drivers. However, they are also useful for remote-desktop scenarios, virtual keyboards, or for taking screen shots.
Note that those interfaces are security critical. When handing out a capture interface to a component, the component becomes able to observe the screen content of all applications present at the GUI server. Vice versa, by handing out an event interface to a component, the component becomes able to inject user-input events to the GUI server, acting on behalf of the user. The built-in choices allow a component to be connected to either the system-global GUI server, or specifically to the management GUI.
CPU-resource assignment
|
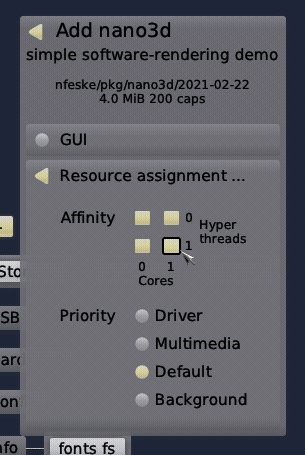
You may already have noticed the additional item "Resource assignment ..." in the component-configuration dialog (Figure 20). It leads to a sub menu for restricting the CPU usage of the new component. The configuration dialog shows a matrix of CPU cores where the x-axis denotes the physical cores and the y-axis the hyperthreads. By default, all available CPU cores are selected. You can toggle the nodes by clicking on them. The dialog ensures that the selection is always a rectangular area. So one click may affect nodes other than only the clicked one.
Below the CPU-affinity matrix, the dialog allows for the selection of the component's scheduling priority. Note that here the notion of priority refers to hard static priorities as opposed to nice levels. That is, a high-priority activity prevents all lower-level priorities from executing. Consequently, the assignment of a high priority comes at the risk of starving lower-priority components. The dialog presents four options:
- Driver
-
The highest priority should be preserved to latency-critical device drivers such as audio drivers. This option is also a sensible choice for trusted components that must stay somewhat responsive under any condition. For example, the components of the leitzentrale GUI operate on this priority to preserve the user's control over the system even in the event of a rampaging high-priority device driver.
- Multimedia
-
The second-highest priority is recommended for latency-sensitive applications such as audio and video players as well as their dependencies. For example, it is the appropriate priority for window-management components.
- Default
-
The default priority is suitable for all regular applications as well as storage and networking components.
- Background
-
The lowest priority is designated for non-interactive best-effort workloads such as long-running computations. By assigning the background priority to such components, they won't impede the user's perception of the responsiveness of the system.
Service-level sandboxing
In order to deploy any component, all resources requested by the component must be assigned to appropriate services. For example, when adding a web browser, the browser's request for audio-in/out session must be satisfied, which is natural when consuming multimedia content. However, in other situations, we may deliberately want to isolate the web browser from the audio hardware, forcibly preventing the browser from producing any noise or tapping the microphone.
This is where the so-called "black hole" component enters the picture, which can readily be deployed from the package genodelabs -> Tools -> black hole. The black-hole component provides pseudo services for most resources mentioned in the previous section, including audio, networking, video capture, USB, and ROM. Hence, the resource requirements of an untrusted component can be satisfied without exposing a real resource. This is especially useful for deploying highly flexible components like VirtualBox, which supports many host-guest integration features, most of which are desired only in a few scenarios. For example, to shield a virtual machine from the network, the "Network" resource of the VirtualBox instance can simply be assigned to the "black hole".
Runtime management
|
In contrast to the drivers subsystem and the Leitzentrale, which have a predefined purpose, the runtime subsystem is shaped by the user. The components present in the runtime subsystem are displayed by the components view. Some of them are managed by the Leitzentrale. For example, while inspecting a file system, the corresponding "inspect" component appear automatically. Other components correspond to subsystems deployed from installed packages, in particular the ones created via the "+" menu.
The current configuration of the runtime subsystem is available at the config file system at managed/runtime. It is not recommended to modify this file manually. However, in some situations, it is useful to take manual control over the runtime configuration. This is possible by copying the file to the root of the config file system. Note that this will inhibit the management functionality of the Leitzentrale. You can yield back the control to the Leitzentrale by removing the runtime file from the root of the config file system.
As a prerequisite for deploying user-selected components, a default storage location must be defined by selecting the "Use" button of a file system in the menu. For the start, it is best to select the "ram" file system as storage location. Once you are comfortable with Sculpt, you may make the installation and customizations permanent by using a real storage device instead.
The selection of a "used" file system has two immediate effects. First, any files present at config/<VERSION>/ at the selected file system are copied to the config file system. As the RAM file system is empty, no files are copied. Second, the so-called depot/ is initialized at the selected file system. The depot is the designated place for the installation of software packages. By default, the depot is initialized such that the Sculpt system accepts software from Genode Labs as well as from a few members of the Genode community. You may inspect the content of /ram/depot using the inspect window.
With a file system and an Internet connection selected, additional software can be installed and run. The most convenient way is the interactive use of the + menu to browse the catalogues of packages provided by software providers and to configure new component instances.
Additionally, the deployment can be controlled by the deploy file of the config file system and the so-called launchers located at the launcher/ sub directory. The deploy file contains a <start> node for each running component. Such a <start> node specifies the package, the assigned resources, and the rules of how the component is connected with other components.
Alternatively, a <start> node may refer to a launcher that encapsulates this policy as a separate file at the launcher/ directory. By default, the launcher corresponds to the name attribute of the start node. It is possible to explicitly refer to a differently named launcher by specifying a launcher attribute. This way, one launcher can be instantiated multiple times. The files within the launcher/ directory are monitored by Sculpt and therefore can be edited on the fly. This is especially useful for editing <config> nodes of already running components. A <config> node within a launcher - when present - overrides the one provided by the package. In turn, a <config> node within a node of the deploy config overrides any other <config> node. Both the launcher and a <start> node may contain a <route> node. The routing rules defined in the <start> node have precedence over the ones defined by the launcher. This way, the routing of a launcher can be parameterized at the deploy configuration.
Each time the deploy file or a launcher file is written, the change takes immediate effect. In particular, the Sculpt manager will automatically kick off the download of the referenced packages and its dependencies and thereby populates the depot. Once the download has completed, the packages are started.
Interplay of the deploy configuration and interactive changes
The content of the deploy file is taken as the starting point for the interactive use via the + menu. All interactive changes to the deployment are reflected in the managed/deploy file. Note that any modification of deploy resets managed/deploy to the state defined in the deploy file.
Launchers appear at the top level of the + menu. So they are a convenient mechanism to quickly add often-used components with specific policies to the system.
Storage device access and preparation
Whereas the RAM file system is practical for quick tests, it goes without saying that we want to persistently store data, programs, and configuration information on a storage device. Sculpt supports SATA disks, NVMe devices, and USB-storage devices. The storage and USB nodes of the components view list all devices detected by the drivers subsystem. A click on a device reveals possible operations or - if a partition table is present - more details about the device structure.
Depending on the operation selected by the user, the Sculpt manager will automatically spawn helper components in the runtime to perform the selected operation. For example, by selecting the "Format device" operation, the Sculpt manager will create a tiny Unix-like subsystem with the selected block device mounted at /dev/block and e2fsprogs mounted at /. This Unix-like subsystem runs mkfs.ext2 as init process. Likewise, an existing EXT2 file system can be checked by activating the "Check" button, which triggers the execution of fsck.ext2 for the selected file system.
A particularly interesting option is presented at the last partition of the Sculpt USB stick. Initially - right after copying Sculpt's tiny disk image to the USB stick - the partition is only a few MiB in size. However, using the "Expand" operation, the partition can be extended to the full size of the USB stick, which makes enough room to use the USB stick as Sculpt file system. This clears the way for sculpting a custom live system stored entirely on the USB stick.
All file systems supported by Sculpt present an "Inspect" button. By toggling this button, the selected file system becomes accessible in the "Inspect" tab. Note that more than one file system can be inspected at a time. Each file system will appear as a directory at the root of the inspect directory tree, named after the corresponding device and partition number. This way, the inspect window becomes a convenient tool for copying files between file systems. Under the hood, the Sculpt manager spawns a file-system component for each inspected file system, which translates the notion of files and directories to block-device accesses.
Making customizations permanent
It is possible to make any customization of the config file system permanent by copying the modified files to a directory named config/<VERSION> on a persistent file system where <VERSION> corresponds to the Sculpt version number as found in the /VERSION file. Each time this file system is selected for "Use", those files will be automatically copied to the in-memory config file system.
The most important customization is the system composition, usually created via the + menu. To make it permanent, copy the current state of /config/managed/deploy to /<DISK>/config/<VERSION>/deploy where <DISK> corresponds to your Sculpt partition. This deploy configuration will take effect whenever the Sculpt partition is selected for "Use".
To streamline the boot procedure into a customized Sculpt system even more, it is possible to mark one file system as default. At boot time - when the Sculpt manager discovers the attached storage devices - it automatically selects a file system for use according to the following order of preference:
-
Partition named "GENODE*" on a USB device in a GPT (GUID Partition Table),
-
Partition named "GENODE*" on a SATA or NVMe storage device in a GPT,
-
An entire SATA or NVMe device used as a single EXT2 file system (as devised by Sculpt EA).
The storage dialog hosts a convenient "Default" button that allows one to toggle a partition label between "GENODE" and "GENODE*". For example, the last partition of the Sculpt USB stick can be marked as default or non-default using this button.
Advanced usage
Manual configuration
Thanks to the Sculpt-manager component of the Leitzentrale, many typical work flows and configuration tweaks are largely automated. For example,
-
The management of storage devices,
-
The creation of file-system components for used or inspected file systems,
-
The selection and configuration of network access,
-
Font size selection depending on the screen resolution,
-
Keyboard-layout selection, or
-
Triggering the download of missing depot content on demand.
This convenience comes at the price of built-in policy, which may stand in the way of sophisticated scenarios. For this reason, almost all policies of the Sculpt manager can be overridden by manually managed configuration files.
The Sculpt manager interacts with the rest of the system solely by monitoring reports aggregated in the report file system, and writing configuration files into the config file system. All files generated by the Sculpt manager are located at the managed/ sub directory of the config file system. By manually creating a same-named file at the root of the config file system, one can supply a custom managed configuration to the Sculpt manager. A useful practice is taking a snapshot of the generated configuration as a starting point for the custom version. For example, by copying the NIC router configuration while it is connected to a network:
cp /config/managed/nic_router /config
Now, the copy at /config/nic_router can be edited. Note that changes usually take immediate effect.
Examples of manual customization are:
-
Adding custom NIC router policies such as port-forwarding rules,
-
Installing depot content manually by managing /config/installation by hand. This includes the ability to download the source code for any package.
-
Disarming the automated update mechanism by using a /config/installation file with no <archive> entries.
-
Fixing the current state of the runtime subsystem by copying /config/managed/runtime to /config/runtime. This allows one to manually tweak and inspect the runtime in any way, e.g., to enable additional reporting when troubleshooting.
-
Manually defining the default font sizes by creating a custom config/fonts configuration.
-
Managing Wifi credentials manually by supplying a custom config/wifi file.
To revert any manual customization, delete the corresponding file. In this case, the Sculpt manager will take over again. Note that all manual customizations can be made permanent by following the steps explained in Section Making customizations permanent.
Building the boot image
The following steps assume that you have the Genode tool chain installed on a GNU/Linux system. For reference, Ubuntu 18.04 is known to work well. If you don't know your way around Genode's source tree yet, please consider the "Getting started" section of the Genode Foundations book that is available as a free download at https://genode.org.
-
Clone Genode's Git repository:
 git clone https://github.com/genodelabs/genode.git
 cd genode
 git checkout -b sculpt-22.04 sculpt-22.04
-
Download the support for the NOVA microkernel
./tool/depot/download genodelabs/bin/x86_64/base-nova/2022-04-27
The content is downloaded to the public/ directory and extracted to the depot/ directory.
-
Download all ingredients for the Sculpt boot image
./tool/depot/download \ genodelabs/pkg/x86_64/sculpt/2022-04-27 \ genodelabs/pkg/x86_64/drivers_managed-pc/2022-04-27 \ genodelabs/pkg/x86_64/wifi/2022-04-27 \ genodelabs/bin/x86_64/ipxe_nic_drv/2022-04-27 -
Create a build directory
./tool/create_builddir x86_64
-
Configure the build directory by editing build/x86_64/etc/build.conf. Most importantly, enable the gems source-code repository where the Sculpt scenario resides. In addition, the libports, ports, pc, dde_linux, dde_rump, and dde_ipxe repositories are needed as well. Second, change the default configuration of the QEMU_RUN_OPT variable to image/disk instead of image/iso. This way, the build process will produce a valid disk image with a GPT partition table instead of a legacy ISO image.
-
Prepare GRUB 2, which is needed for booting from the disk image
./tool/ports/prepare_port grub2
-
Create the Sculpt boot image (defined by the run script at repos/gems/run/sculpt.run)
make -C build/x86_64 run/sculpt KERNEL=nova BOARD=pc
The boot image is created at build/x86_64/var/run/sculpt.img.
-
Write the boot image to a USB stick:
sudo dd if=build/x86_64/var/run/sculpt.img of=/dev/sdx bs=1M conv=fsync
Here, /dev/sdx refers to the device node of your USB stick. To determine it, you may inspect the output of dmesg after plugging it in.
Reproducing the system from source
Section Building the boot image presents the creation of the boot image from pre-built packages. You may prefer to build those packages from source, in particular for customizing the system.
Before building the packages, various ports of 3rd-party software need to be prepared. The following command prepares all of them at once:
 <GENODE-DIR>/tool/ports/prepare_port \
      acpica ada-runtime bash cbe coreutils curl \
      dde_bsd dde_ipxe dde_linux dde_rump e2fsprogs-lib \
      expat freetype gnupg grub2 jitterentropy jpeg \
      libarchive libc libdrm libgcrypt libiconv libpng \
      libsparkcrypto libssh libusb libuvc libyuv linux \
      linux-firmware mesa ncurses nova openssl qemu-usb \
      qoost qt5 stb stdcxx ttf-bitstream-vera vim \
      virtualbox5 virtualbox6 x86emu xz zlib
To be able to compile components that are dependent on the Qt5-library, the corresponding toolchain needs to be installed in addition to the base Genode toolchain. You can build and install it by using the following commands:
 <GENODE-DIR>/tool/tool_chain_qt5 build
 <GENODE-DIR>/tool/tool_chain_qt5 install
The ingredients of the boot image are defined by the sculpt/default-pc.sculpt file located in the repos/gems/ repository. The default set of software installable at runtime is subsumed by the pkg/sculpt_distribution and pkg/sculpt_distribution-pc packages. You can find the depot recipes for these packages at repos/gems/recipes/pkg/. You may want to create your version of these packages by changing the package provider from genodelabs to <YOU> by adding the line
RUN_OPT += --depot-user <YOU>
to your <build-dir>/etc/build.conf.
To build the boot image including all required depot packages, it's best to instruct the build system to manage the versioning and updating of the depot content automatically by enabling the following line in your build.conf file.
RUN_OPT += --depot-auto-update
With these precautions taken, the execution of the sculpt.run script - as described in Section Building the boot image - implicitly builds all required binary packages from source.
The sculpt_distribution and sculpt_distribution-pc packages can be created independently from the sculpt.run script by using the depot/create tool manually.
 <GENODE-DIR>/tool/depot/create \
      UPDATE_VERSIONS=1 FORCE=1 REBUILD= \
      <YOU>/pkg/x86_64/sculpt_distribution \
      <YOU>/pkg/x86_64/sculpt_distribution-pc
The FORCE=1 argument ensures that source archives are re-created and checked for the consistency with their versions. Whenever the source code of any of the archives changes, the UPDATE_VERSIONS=1 argument automatically updates its version. Please don't forget to commit the updated hash files. The empty REBUILD= argument limits the creation of binary packages to those that do not yet exist in binary form. If not specified, the command would recompile all packages each time. You may further add -j<N> to parallelize the build process where <N> is the level of parallelism.
To make the created packages available for download from within the running Sculpt system, you must publish them. This involves the archiving, signing, and uploading of the content. The former two steps are covered by the tool/depot/publish_current tool. For more information about working with the depot tool, refer to https://genode.org/documentation/developer-resources/package_management.
The launchers integrated in the boot image are defined in gems/sculpt/default-pc.sculpt and the accompanied files at gems/sculpt/launcher/. Each launcher contains a node with a mandatory pkg attribute. If the attribute value contains one or more / characters, it is assumed to be a complete pkg path of the form <USER>/pkg/<NAME>/<VERSION>. Otherwise it is assumed to be just the pkg name and is replaced by the current version of the current depot user's pkg at system-integration time.
Updating the USB boot device from within VirtualBox
The /config/deploy example is prepared to assign USB storage devices directly to a running virtual machine. You may inspect the report /report/drivers/usb_active_config to get a list of attached USB devices. Use Vim to copy the <policy> node of the selected device into the <inline> section within the /config/launcher/usb_devices_rom file, and adjust the line as follows:
-
Replace the node type <policy> by <device>, and
-
Rename the attribute label_suffix to label.
The updated usb_devices ROM prompts VirtualBox to open a USB session at the drivers subsystem. Hence, when saving the modified /config/launcher/usb_devices_rom file, the guest OS should detect a new USB device (check the output of dmesg). You may now write a new version of the Sculpt ISO image to the device by following the steps described in Section Building the boot image.
Credits
Sculpt is an example system scenario of the Genode project, which is an operating-system technology designed and developed from scratch.
- Genode OS Framework
That said, Genode is not developed in a vacuum. It rather stands on the shoulders of giants and greatly benefits from the free-software/open-source community. The following projects play a particularly important role for the Sculpt scenario.
- NOVA microhypervisor
-
Sculpt's kernel is a derivate of NOVA, maintained by Genode Labs. NOVA was originally created by Udo Steinberg https://hypervisor.org.
- Linux kernel
-
Sculpt reuses several Linux subsystems as individual components, in particular the USB stack, the Intel wireless stack, the Intel graphics driver, and the TCP/IP stack.
- NetBSD's rump kernel
-
https://wiki.netbsd.org/rumpkernel/
The file-system support is based on NetBSD kernel code, which became reusable on Genode thanks to the rump kernel project.
- FreeBSD
-
The C runtime that is used by most 3rd-part software is based on FreeBSD's libc.
Device drivers
- WPA supplicant
-
https://w1.fi/wpa_supplicant/ (used by the wireless driver)
- iPXE
-
https://ipxe.org (basis of the wired network driver)
- xf86emu
-
https://xorg.freedesktop.org/ (used by the VESA driver)
- OpenBSD
-
https://www.openbsd.org (basis for the audio driver)
- libusb
-
https://libusb.info (used by the webcam driver)
- libuvc
-
https://ken.tossell.net/libuvc/doc/ (used by the webcam driver)
Programs and libraries used within the Unix-like subsystems
- Vim
- ncurses
- GNU coreutils
- GNU bash
- E2fsprogs
Libraries used for the package-management infrastructure
- curl
-
https://curl.haxx.se (basis of the fetchurl tool)
- libssh
- OpenSSL
- XZ Utils
-
https://tukaani.org/xz/ (support for tar.xz archives)
- libarchive
-
https://www.libarchive.org (basis of the extract tool)
- zlib
- GnuPG
-
https://www.gnupg.org (basis of the verify tool)
- Jitterentropy RNG
Applications
- VirtualBox
-
https://www.virtualbox.org (used for hosting virtual machines)
Libraries used for the graphical user interface
- libpng
-
http://www.libpng.org/pub/png/libpng.html (used for decoding PNG images)
- stb
-
https://github.com/nothings/stb (used for rasterizing TrueType fonts)
- Mesa 3D
-
https://mesa3d.org (used for hardware-accelerated 3D graphics)
Crucial tools used during development
- GNU/Linux
-
(various distributions)
- Git
- GNU compiler collection
- GNU binutils
- GNU make
- Tcl
- Expect
- Qemu
- GitHub issues